How to Build Your Stretch Wall by Rapid Print Pro in 5 Minutes
Need a photo-ready backdrop faster than the kettle boils? Your Rapid Print Pro stretch fabric wall is designed to go from carry case to camera-ready in roughly 5 minutes once you’ve done it once or twice.
Below is a step-by-step build guide
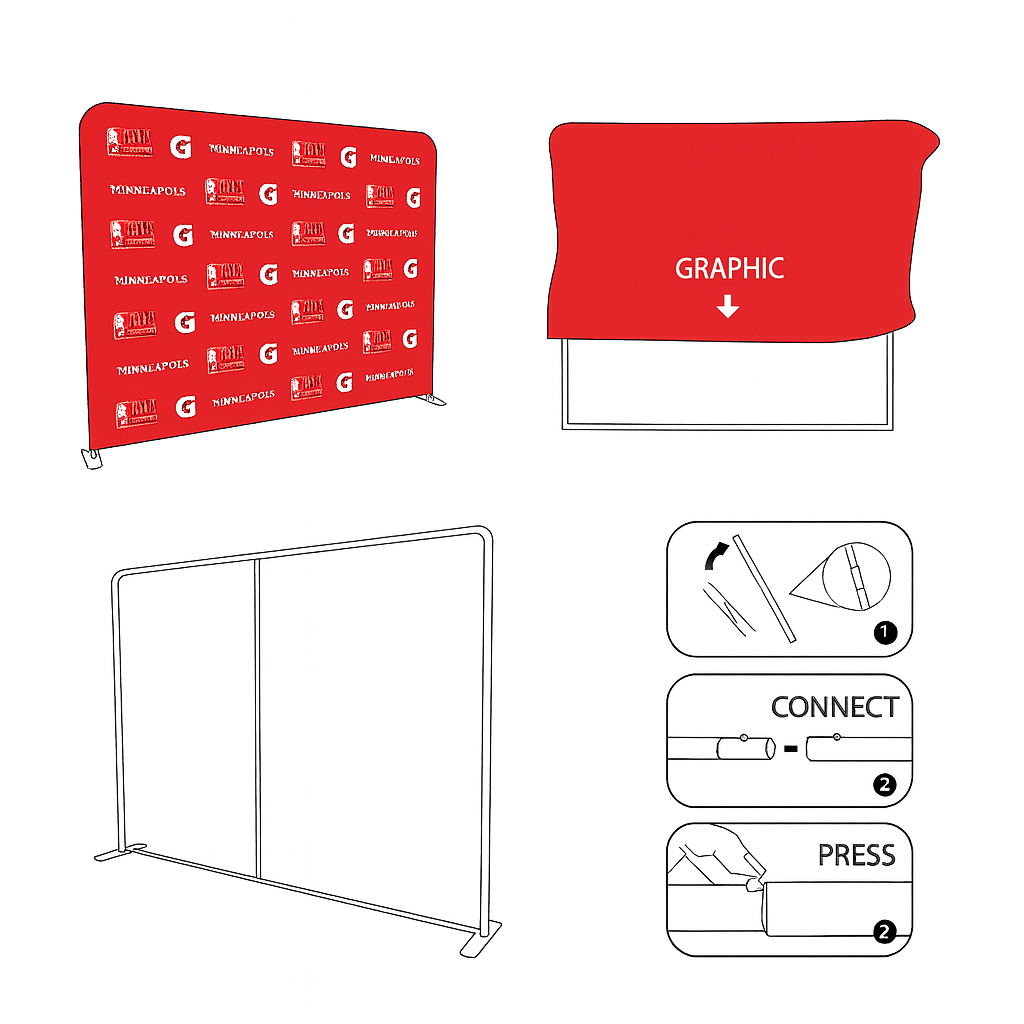
What’s in the bag?
When you open the carry case, you should see:
📦 1x soft carry case
🦵 2x metal feet
🧱 Aluminium poles (numbered / lettered)
Bottom bar sections
Vertical uprights
Top curved pieces
🧦 1x printed fabric “sock” graphic (zip usually along the bottom)
5-Minute Step-by-Step Assembly
Cant be bothered to read, heres a video of how to build it: VIDEO GUIDE
Step 1: Clear a bit of floor space
Find a clean, flat area. Lay the carry case on the floor and unzip it fully so nothing is fighting you.
Step 2: Lay out your frame parts
Take everything out and lay the poles in number order:
Put matching numbers / letters together.
Place the feet and bottom bar closest to you.
Keep the folded fabric graphic to one side for now.
Pro tip: snap a quick photo on your phone. Next time, you’ll know what “complete” looks like at a glance.
Step 3: Build the base
You’re making the “goal post” from the ground up:
Find the bottom bar sections.
Connect them together, pushing until the snap button clicks into place.
Slide each end of the bottom bar into a foot and secure (snap button / screw depending on your model).
Now you have a long bar sitting on two feet. That’s your foundation.
Step 4: Add the vertical uprights
Find the vertical pole sections that match the numbers on the base ends.
Connect each upright section one at a time, pressing the snap button as you go.
Make sure all joints are fully home and the buttons have popped through the holes.
You should now have two vertical posts sticking up from the base.
Step 5: Connect the top curve
Time to complete the rectangle:
Grab the top curved pieces.
Connect them together if they’re in sections.
Attach the ends to the top of each upright, again making sure snap buttons are fully engaged.
You now have the full stretch wall frame standing on its feet. 🎯
Step 6: Quick safety check
Before the fabric goes anywhere near it:
Tug gently at each joint. Nothing should wobble or slide out.
Check the feet are flat on the floor, not sitting on a cable or the edge of a mat.
Make sure the frame is standing straight and square.
If it looks like a wobbly shopping trolley, fix it now, not when the graphic’s on!
Step 7: Prep the fabric “sock”
Grab your printed fabric graphic:
Find the zip – that’s your bottom.
Identify the front side (usually the side with your main design).
Hold the graphic so the top of the image is at the open end, ready to slide over the frame.
If you have two people, stand on opposite sides and each hold a top corner.
Step 8: Feed the frame into the sock (top first)
Think “giant pillowcase”:
Lift the graphic above the frame and pull it down over the top bar.
Feed the corners of the frame into the corners of the fabric.
Work your way down evenly on both sides so the fabric doesn’t twist.
Two-person cheat code: one person steadying the frame, the other walking the fabric down makes this super quick.
Step 9: Pull down & tension
As the graphic moves down:
Gently pull the fabric over the uprights, easing over any joints.
When it reaches the base, make sure the zip is centred and level.
Smooth any big creases with the flat of your hands.
The fabric should now be snug but not impossibly tight.
Step 10: Zip & tidy the base
Bring the two edges together along the bottom bar.
Zip closed from one side to the other.
Tuck any excess fabric neatly under the frame so it’s hidden behind the feet.
Stand back: you should have a tight, crease-free stretch wall.
Step 11: Final polish
For that “print showroom” look:
Give the fabric a final hand smooth from centre outwards.
Check there’s no twist in the graphic (logos straight, text horizontal).
Nudge the feet so the wall sits perfectly parallel to your back wall or camera.
Boom. Ready for selfies, step-and-repeat, Zoom backgrounds, expo stands… whatever you’re throwing at it.
Step 12: Pack down (when you’re done)
Reverse the process:
Unzip the bottom.
Lift the fabric off from the top and fold gently (don’t scrunch).
Press snap buttons, separate poles, and lay back in the case in groups.
Zip up. Ready for the next event.
Blog Version: “Build Your Stretch Wall in 5 Minutes (Yes, Really)”
Title:
How to Build Your Stretch Wall by Rapid Print Pro in 5 Minutes
Intro:
If you’ve ever tried to build a display stand that came with instructions drawn by a bored squirrel, you’ll appreciate this. Your Rapid Print Pro stretch wall is the opposite of that: lightweight aluminium frame, tension fabric “sock” graphic, and a setup time that fits neatly between “kettle on” and “tea’s ready”.
Here’s how to go from carry case to full-size fabric backdrop in around five minutes, without tools, drama, or creative swearing.
1. Unpack like a pro
Unzip the carry case and lay everything out on a clean floor. You’re looking for:
Two feet
A bunch of numbered aluminium tubes
The folded fabric graphic with a zip on one side
Treat this like big-kid Meccano: if the numbers match, they go together.
2. Build the bones: frame assembly
Start from the bottom, literally.
Connect the bottom bar sections and attach them to the feet.
Build the vertical uprights, clicking in each numbered pole.
Add the top curved section to complete the frame.
If you can put together flat-pack furniture, you are wildly overqualified for this step.
3. Check it before you dress it
Give the frame a quick health check:
Are all the snap buttons properly engaged?
Is the frame standing upright, not leaning like it’s had a long Friday?
Are the feet flat on the floor?
Fix anything now. It’s ten times easier before the fabric goes on.
4. Slide on the star of the show: your graphic
Your printed fabric graphic is a tension “sock” that stretches over the frame.
Find the bottom zip. That’s your orientation anchor.
Hold the graphic above the frame with the front design facing you.
Pull it over the top bar and work it down both sides evenly.
With two people, this step is an absolute breeze. With one person, it’s still pretty painless.
5. Tension, zip, done
When the graphic reaches the bottom:
Tug gently to remove any sagging.
Zip along the base to fully tension the fabric.
Smooth out any remaining ripples with your hands.
Congratulations: your Rapid Print Pro stretch wall display is now expo-ready, photo-ready, Zoom-background-ready, and generally looking fantastic.
Quick Troubleshooting
Fabric too loose?
Check the frame is fully assembled and the zip is completely closed. A half-connected pole or half-done zip will steal tension.
Fabric won’t reach the bottom?
You might have the graphic upside down or the frame sections swapped left to right. Check the numbers and flip the graphic if needed.
Frame feels wobbly?
Make sure both feet are fully seated and all snap buttons have popped through their holes.
Why this setup rocks for events
✅ Fast setup: genuinely around 5 minutes once you know the steps
🚗 Portable: everything collapses into a single carry case
📸 Camera friendly: smooth, crease-free tension fabric
🔁 Reusable: swap the graphic sock for a new campaign without replacing the hardware
Whether you’re at a trade show, a hotel conference, or just turning the office into a mini studio, your Rapid Print Pro stretch wall is built to look premium without behaving like a diva.